Nest box camera - (page 2)
The main components & testing the camera
Page 1 - HandyKam review Page 3 - Installing and adjusting the camera
Page 4 - Where to install the nest box
If you've reached this page via a search engine, it would be worth visiting page 1 and finding out what's included in HANDYKAM's very comprehensive kit. The main components are shown below, but there's more to this kit than the usual bird box camera kits ....... much, much more!
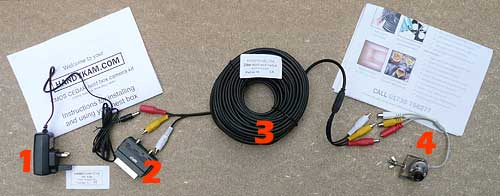
Many people are put off installing a nest box camera on the basis that it's too technical. The so called 'technical' bit simply involves connecting the cables as shown in the illustration below. This will be similar for kits supplied by other manufacturers. The SCART adaptor connects to a SCART socket that's found at the back of virtually all domestic televisions, video recorders and DVD recorders. It enables you to view the video and audio from the camera on your video equipment. SCART stands for Syndicat des Constructeurs d'Appareils Radiorécepteurs et Téléviseurs, just in case you're interested!
Components, from left to right are (1) power supply, (2) SCART adaptor, (3) 20 metres (65 feet) of connecting cable (4) miniature colour / black and white camera with infra red night vision. If you determine that 20 metres of connecting cable will not be long enough, then HANDYKAM can supply you with longer lengths when you place your order.
Click on the picture below for an enlarged view
Very comprehensive instructions are supplied by HANDYKAM.
The illustration and brief comments above show that there's no mystique
to installing this bird box camera.
Even if you intend to connect this system
to a computer at some stage then it's worth coupling it up to a television
first. Do this before installing the camera in the nest box, just to make
sure that everything is working OK.
How to connect the system to a SCART socket or
to the phono connectors
that are found on many televisions, video recorders
and DVD recorders
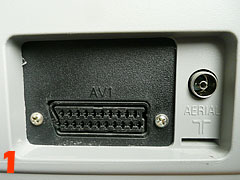
Picture 1 below - SCART sockets can be found on the back of virtually all modern TVs and video equipment. Use the supplied HANDYKAM SCART adaptor to connect here.
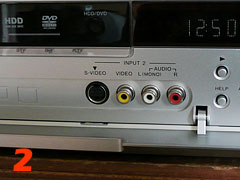
Picture 2 below - Alternatively dispense with the SCART adaptor and couple directly to the yellow and white phono input connectors that can often be found under a drop down flap at the front of some equipment. Failing that, check at the back of the machine for the yellow and white phono inputs, or use a SCART connection instead.
 |
 |
You will need to ensure that your television and / or recorder is switched to the AV channel to receive a picture. If there is sound, but no picture it's most probably something simple such as forgetting to remove the lens cap from the camera! Don't worry at this stage if the picture appears blurred when the camera is pointed at distant objects or if the picture changes to black and white when light levels are low. This is what the camera is designed to do. Focussing is pre-adjusted for the confines of a nest box, but can also be re-adjusted if required.
If it all works, (and it most probably will), then the next stage is fitting the camera inside the nest box and finding a suitable location for the box. Choosing a suitable location is very important and may determine whether birds use the box or not. This is explained on page 3 (see link below).
Visit the HANDYKAM.COM Home Page by clicking on their logo - |
